![logo_green background.png]](https://support.onyo.de/hs-fs/hubfs/logo_green%20background.png?height=40&name=logo_green%20background.png)
With single sign-on (SSO) your employees sign in to onyo with your company login instead of a separate onyo password. This guide shows the setup with Microsoft Entra (previously called Azure AD) step by step. You can configure everything yourself in onyo – no activation by onyo is needed.
Prerequisite: In Microsoft Entra you need the rights to create an app registration (e.g. as an administrator of your Microsoft 365 tenant). Admin consent is not needed for SSO.
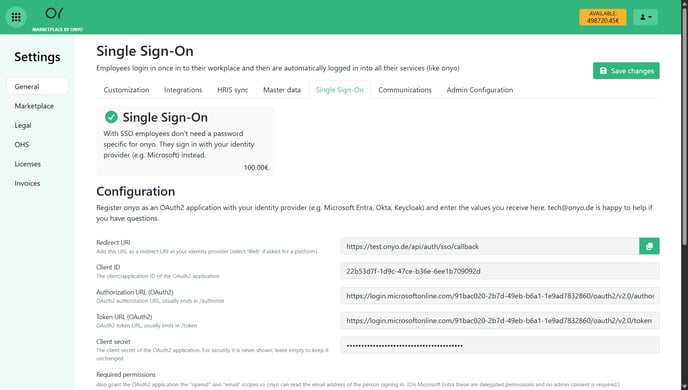
Step 1: Copy the redirect URI in onyo
In onyo, open the single sign-on page (Settings → General → Single Sign-On) and copy the "Redirect URI" under "Configuration" (copy button to the right of the field). We will register this URL in Microsoft Entra in a moment.
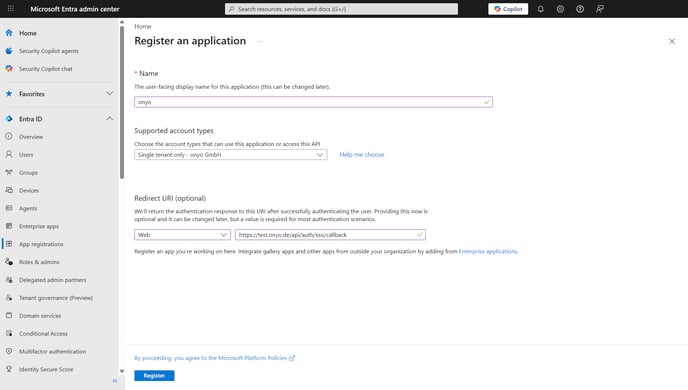
Step 2: Register an application in Microsoft Entra
In the Microsoft Entra admin center, open the "Register an application" page (found under Entra ID → App registrations → "New registration"). Enter e.g. onyo as the Name and keep the "Single tenant only" option under "Supported account types". Under "Redirect URI (optional)" select the Web platform and paste the redirect URI copied in step 1. Click "Register".
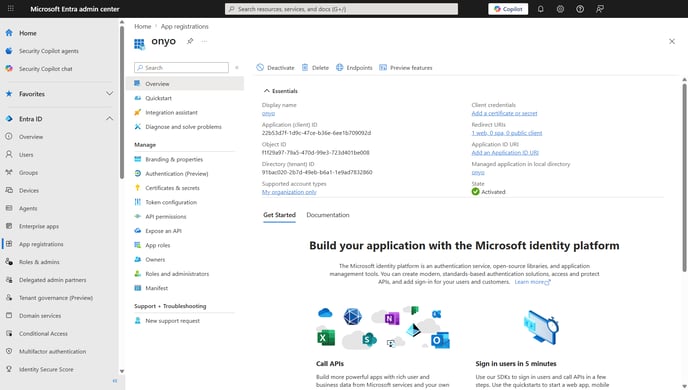
Step 3: Copy the client ID
After registering you land on the application's "Overview". Copy the "Application (client) ID" into the onyo field "Client ID".
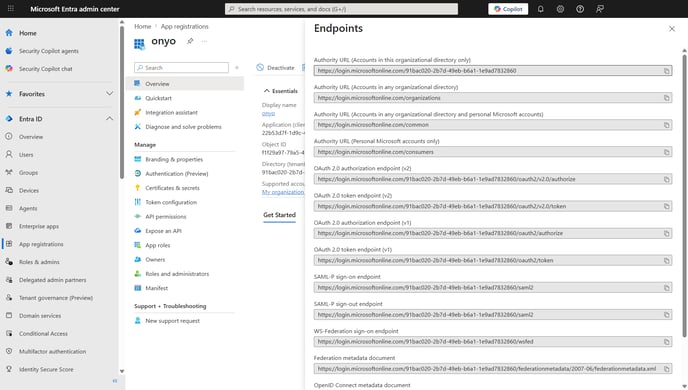
Step 4: Copy the authorization and token URL
At the top of the Overview click "Endpoints". From the side panel, copy the "OAuth 2.0 authorization endpoint (v2)" into the onyo field "Authorization URL (OAuth2)" and the "OAuth 2.0 token endpoint (v2)" into the field "Token URL (OAuth2)".
Step 5: Create a client secret
In the application's menu go to "Certificates & secrets" and click "New client secret". Enter a description (e.g. "onyo SSO"), pick an expiry and click "Add". Copy the secret's Value into the onyo field "Client secret" right away – it is only shown once.
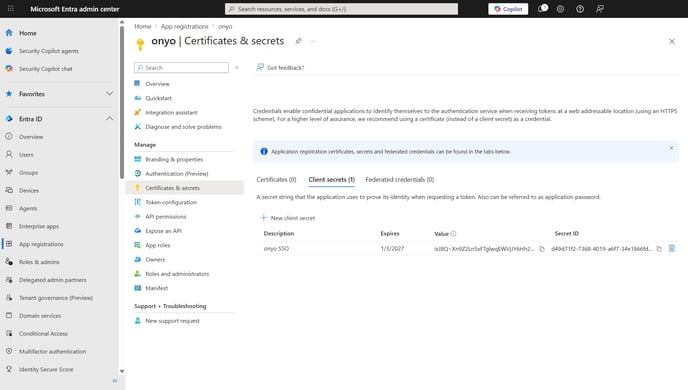
When the secret expires, signing in via SSO stops working: simply create a new secret and enter it in onyo.
Step 6: Grant the openid and email permissions
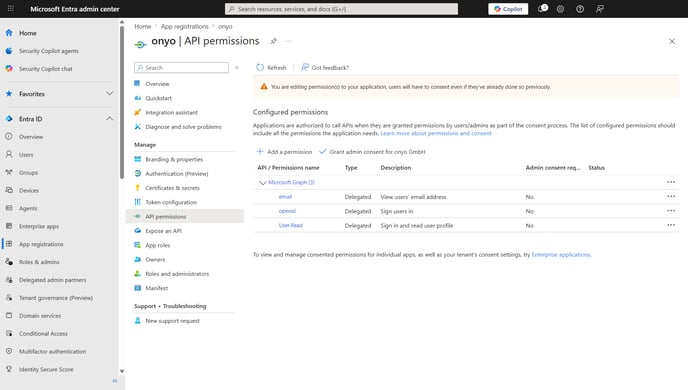
Go to "API permissions" → "Add a permission" → Microsoft Graph → "Delegated permissions" and add the two permissions openid and email. They let onyo read the email address of the person signing in. Admin consent is not required.
Step 7: Save in onyo and choose the login mode
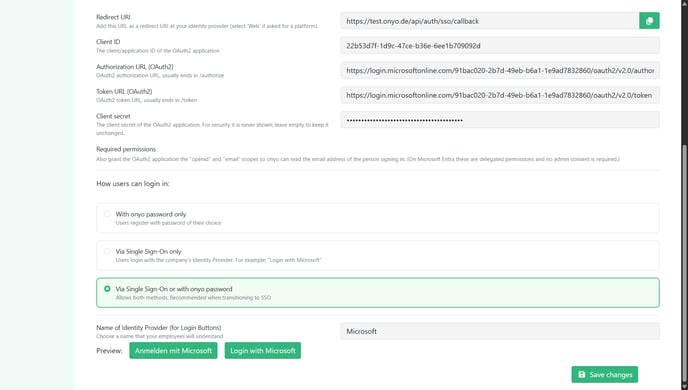
Switch back to onyo. Client ID, Authorization URL, Token URL and Client secret are now filled in. Also set:
- Name of Identity Provider (for Login Buttons) – e.g. "Microsoft". The preview shows right away what the login button will look like ("Login with Microsoft").
- How users can login in – we recommend starting with "Via Single Sign-On or with onyo password". That way you can safely test SSO and nobody gets locked out. The SSO options only become selectable once all fields above are filled in.
Click "Save changes".
Step 8: Test it
Log out of onyo. The login page now shows the "Login with Microsoft" button – click it and sign in with your Microsoft account. Important: the email address of the Microsoft account must match the email address stored in onyo. Once everything works, you can switch the login mode to "Via Single Sign-On only".
Done :) If you have any questions or problems, feel free to reach out to us via the contact form at any time.
Tip: You can use the same Entra application for the HRIS sync as well. The application then needs both permission sets: the delegated permissions from this guide plus the application permissions "User.Read.All" and "GroupMember.Read.All" with admin consent.